
How to Treat Neck Pain with Dr. Tan's Balance Method: A Two-System Case Study
What do you do when two meridians share a single painful band, and both of them point at the same balancing meridian by two entirely different routes? This case is about trusting that convergence instead of second-guessing it: map each sick meridian on its own, run each one through its own system, and let a single leg carry the whole treatment.
A 36-year-old puppeteer comes to our clinic with neck pain on both sides, three days old, rated 4 out of 10. Rotation is what she has lost. Two shows a day, marionettes held high above her head. She also mentions a mild tiredness that has been with her for a few weeks. Let's map it.
When the neck will not rotate and the soreness sits as a band across the top of the back rather than down the spine, two meridians step forward before the rest: the Small Intestine (SI) and the San Jiao (SJ). Both cross that band. And here the tissue matters as much as the pathway — this is muscle, not tendon and not bone. That single word decides which system fits.
Patient Profile
| Age & work | 36-year-old woman, puppeteer, two performances a day with the arms overhead |
| Complaint | Neck pain on both sides, three days, rotation restricted |
| Pattern | Small Intestine 13 to 16 across the top of the back, with San Jiao 15 inside the same band |
| Tissue | Muscle |
| Pain level | 4/10 |
| Secondary | Mild tiredness for several weeks |
Why This Neck Pain Case Needed Two Systems
Two meridians share one painful band here, and they are not neighbours by accident. Small Intestine 13 to 16 runs across the upper back and the shoulder-neck junction. San Jiao 15 sits inside that same territory. Palpating does not separate them, and neither does what she tells you. She cannot turn her head. Both sides are involved.
Here's the temptation: two sick meridians, so reach for two balancing meridians, one for each. It doubles the prescription before a single needle is in. It won't be necessary. Run each sick meridian through the six systems separately and see where they land, because two different systems can deliver you to the same treating meridian. When that happens, the overlap is not a rounding error. It is the treatment plan.
This is Local Balance territory. Find the meridians. Confirm the tissue. Match structure to structure. Palpate for the ashi and needle where the body answers.
The Treatment
Step 1: Map the pain
We start where she points. Both sides of the neck, a band running from SI 13 to SI 16 across the top of the back, and SJ 15 sitting in the middle of it. Two meridians, one zone. Then we press: muscle throughout, not the tendon picture you find at a joint, not periosteal. That single word sets the structural match Step 2 has to honour. Let's go.
Step 2: Pick the systems
Small Intestine goes to the Spleen (SP) through System 2, the branching meridians: hand pairs with foot, Yin with Yang, and the hand Tai Yang meets the foot Tai Yin. San Jiao goes to the Spleen through System 4, the opposite side of the Chinese clock. Two sick meridians, two different systems, one balancing meridian.
Nothing was forced to make that tidy. Each meridian was mapped on its own terms, and each arrived at the Spleen by its own route. And the structural match holds where it matters: muscle for muscle. Neck muscle balanced on Spleen muscle, an anatomical structural similarity at the level of the tissue, not just the meridian name.
Step 3: Needle
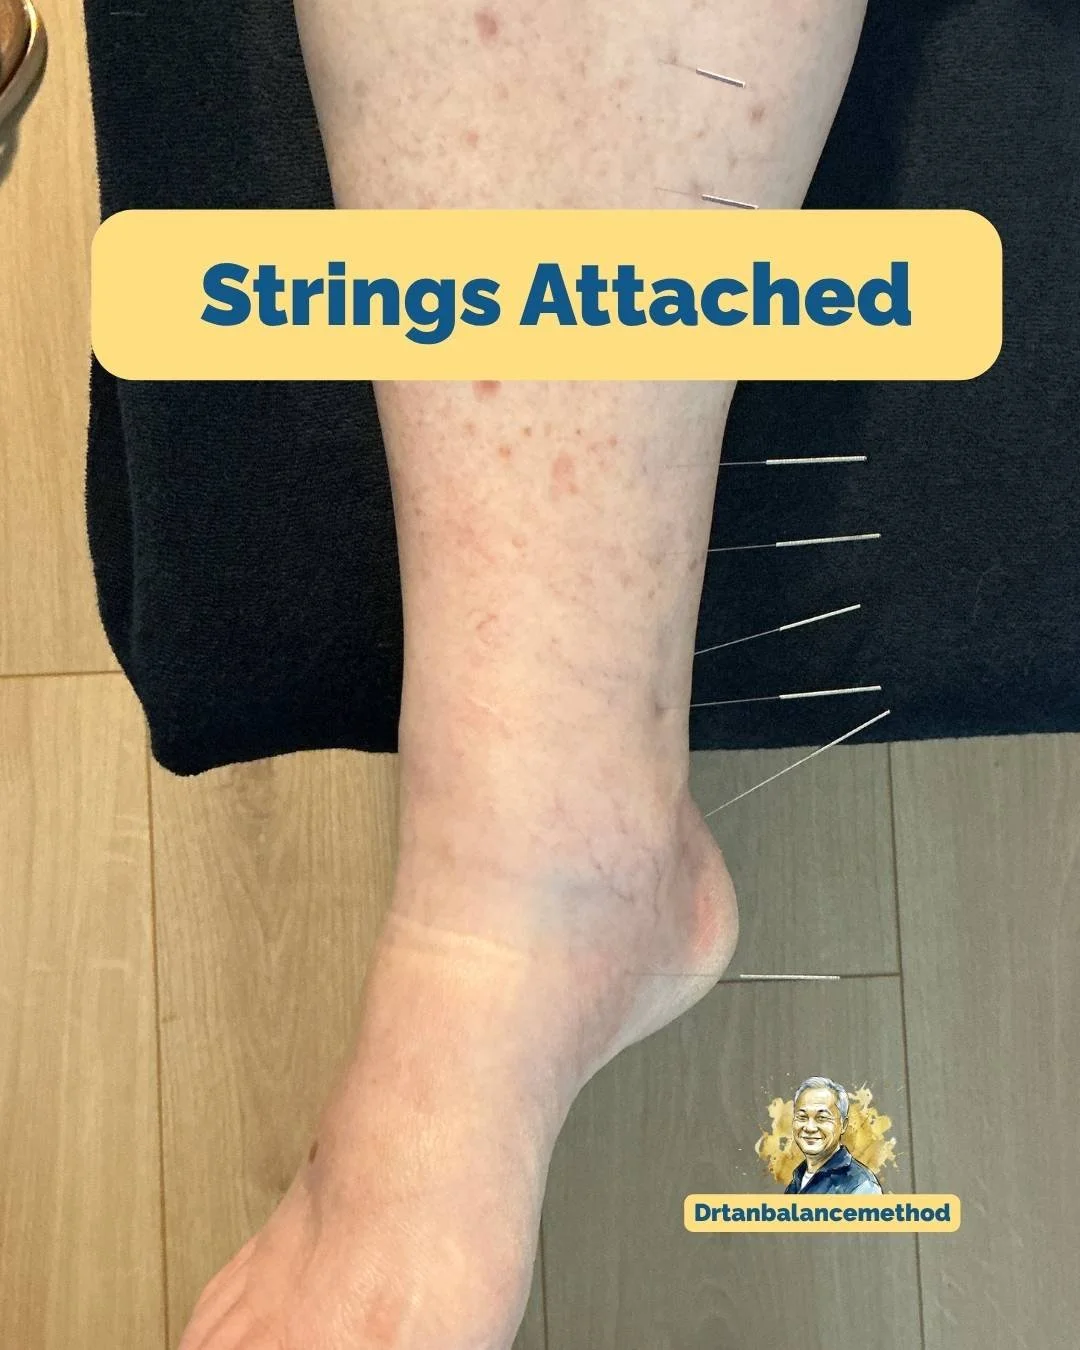
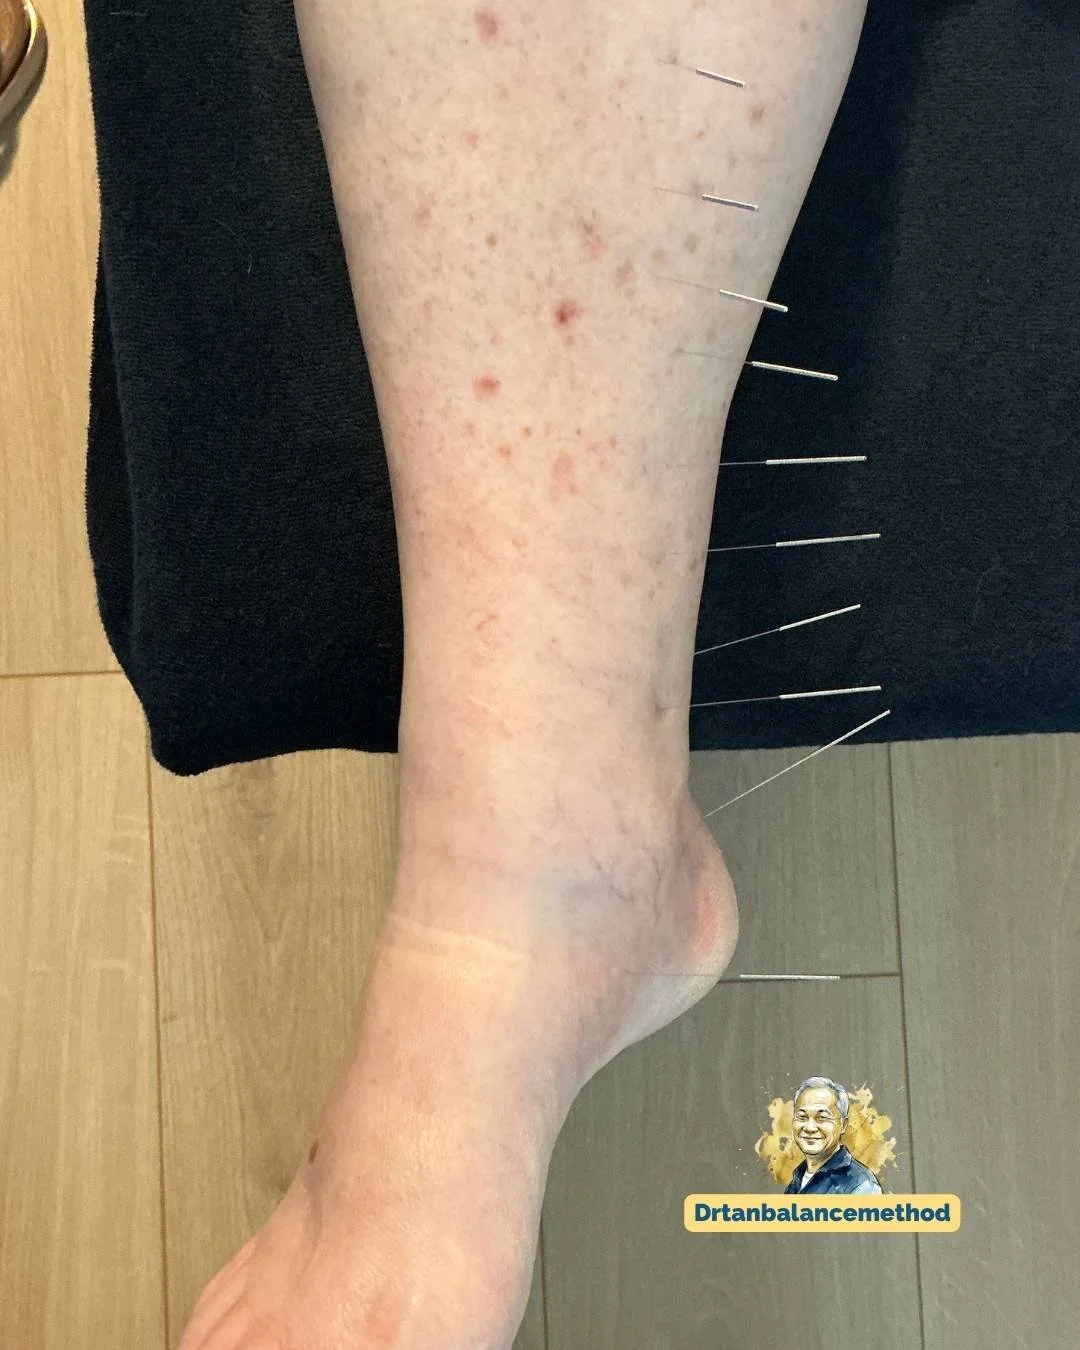
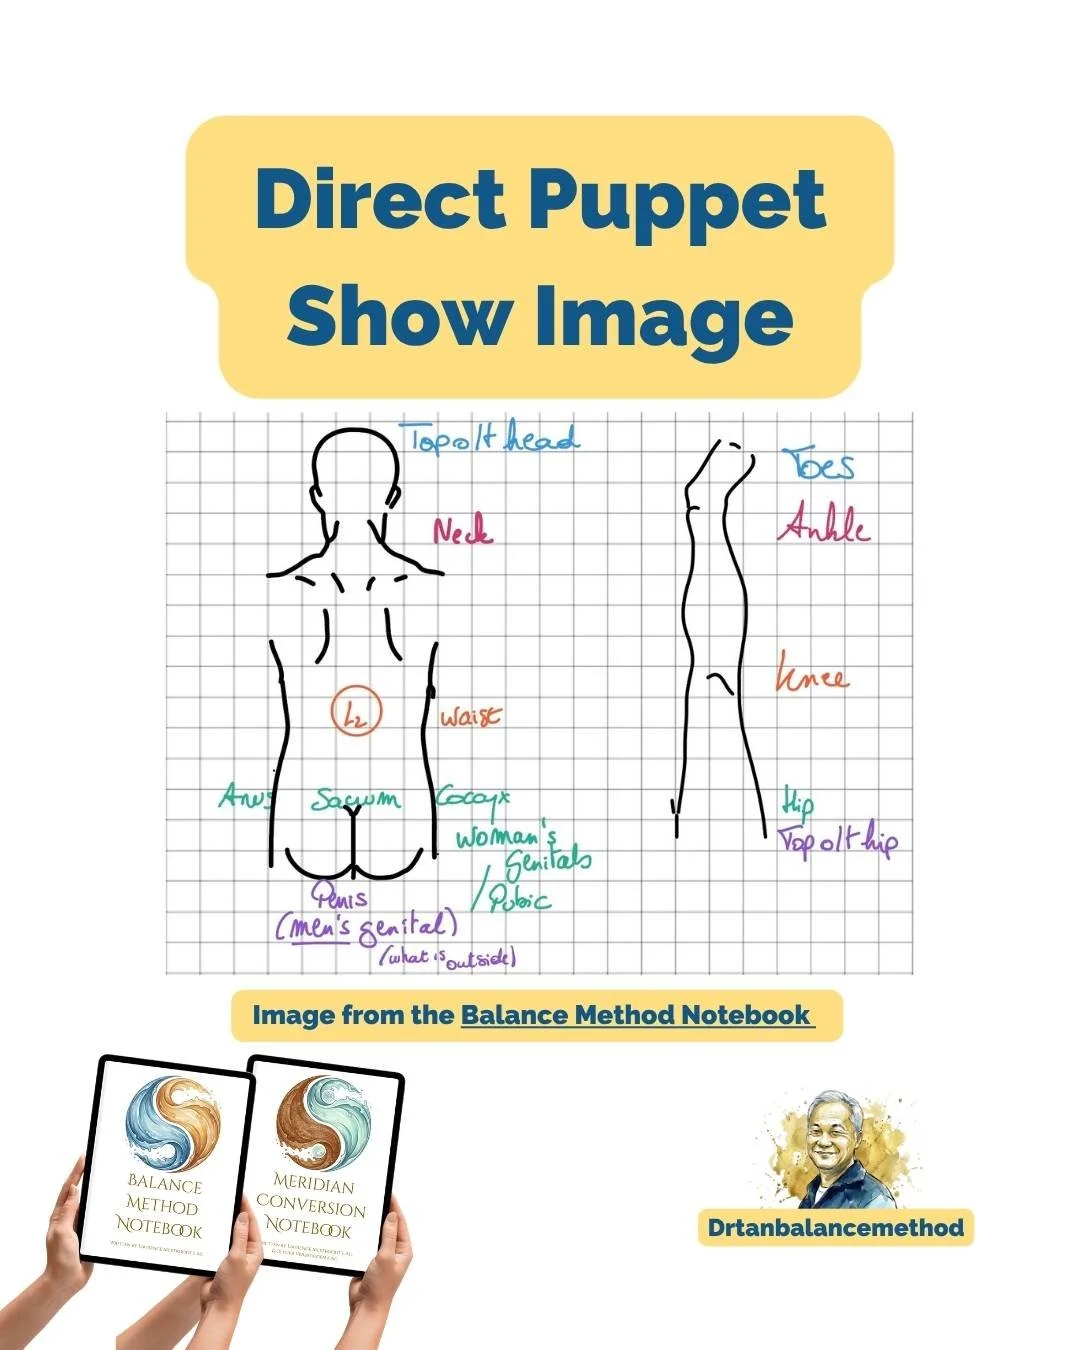
We went to the right leg and read it through the Direct Puppet Show Image: the foot stands for the head, the ankle for the neck, the lower leg for the chest and upper back. So the zone just above the ankle is the upper back. That is exactly where SP 6 to SP 7 runs. The projection lands on the same territory the pain occupies.
We palpated along that stretch and needled where it answered. SP 6 to SP 7, one range along the Spleen meridian, not two separate points. Semi-deep, matching the muscle layer of the complaint.
Then one more layer, deliberately small. We added Kid 2, Kid 4 and Kid 7 for the mild tiredness, chosen through the Five Elements rather than as part of the neck strategy. They sit beside the main treatment, not inside it.
Outcome
Rotation improved immediately. She could turn her head before she came off the table in that first session, which is the result you hope for when the mapping is clean and the projection agrees with it.
She came in for eight sessions in total, and the tiredness eased from around the fourth.
Those two facts are worth keeping apart. The rotation came back on the table in the first session, and it still took eight sessions before that held. What happens under the needle and what stays afterwards are separate outcomes on separate timelines, and for someone who goes back to holding marionettes overhead twice a day, it is the second one that counts.
The Insight: Two Systems, One Meridian
The number of sick meridians does not set the number of balancing meridians. That assumption feels safe, and it quietly inflates every prescription you write. Count that way here and you reach for a second treating meridian and a second set of points. One covered both instead. The systems are separate roads that sometimes end at the same address.
What makes it usable is the order of the work. Map each sick meridian independently. Run each through the systems on its own. Only then look at what you are holding. A convergence you discover is evidence that the mapping was sound. A convergence you arrange in advance to save needles is guesswork wearing the same clothes.
The tissue does the other half. Muscle for muscle is what makes SP 6 to SP 7 the right stretch rather than merely a Spleen point, and it is what sets the depth.
What to Watch For With Two-System Cases
1. Counting balancing meridians off the sick ones
Two sick meridians do not automatically require two treating meridians. Map them separately, run the systems, and check the result before you commit. Convergence is common and it is useful.
2. Skipping the tissue question
Muscle, tendon, bone and joint are not interchangeable. The band here was muscle, so the balance was made at the muscle layer and the insertion followed it. Match the meridian and ignore the tissue, and the structural similarity that gives the system its power is only half applied.
3. Arranging the convergence instead of finding it
Once you know two meridians can share a treating meridian, it is tempting to look for that outcome. Don't. Map each one independently and accept whatever comes out. A convergence that survives honest mapping is worth having. One you steered towards is a shortcut you pay for at the next session.
Apply This in Your Practice
Map every sick meridian on its own before you look at the whole. The convergence in this case only became visible because Small Intestine and San Jiao were each taken through the systems separately. Map them together and you tend to pick one shared answer early, then defend it.
Name the tissue out loud in Step 1. Muscle, tendon, bone, joint. Write it down before you choose a system, because it changes both the structural match and the depth you needle at.
Let the projection confirm the point selection. In the Direct Puppet Show Image the ankle stands for the neck, and the zone just above it for the upper back. When your points already sit in the matching zone, the imaging agrees with the meridian logic rather than competing with it.
Give a small secondary complaint a small answer. Mild tiredness alongside a musculoskeletal complaint does not need a whole pattern built around it. A short Five Elements addition travels with the main treatment without reshaping it. Here, Kid 2, Kid 4 and Kid 7 sat quietly beside a treatment aimed somewhere else entirely.
Quick Reference: This Case
- SI 13 to SI 16 plus SJ 15 → two sick meridians in one band across the upper back, bilateral, muscle
- Small Intestine + System 2 (branching meridians) → Spleen
- San Jiao + System 4 (Chinese clock) → Spleen
- Local Balance, right leg — both systems allow either side
- Direct Puppet Show Image: ankle = neck, just above the ankle = upper back
- SP 6 to SP 7 as a stretch, ashi-guided, semi-deep — muscle for muscle
- Kid 2, Kid 4, Kid 7 through the Five Elements for the mild tiredness
- 4/10 at intake → rotation restored in session 1 · tiredness easing from session 4 · 8 sessions in total
Note: Patient details have been adapted from comparable cases in our clinic to protect privacy. This post is for educational purposes only — for acupuncturists and interested professionals. Not treatment advice or a substitute for professional consultation.
Every System, Every Projection, Every Pattern at Your Treatment Table
Start with the free chapter and see how the reference works in the clinic.
Foundation · 600+ pages
Balance Method Notebook
The complete Local and Global Balance reference, hand-drawn for the treatment table.
Specialization · 500+ pages
Meridian Conversion Notebook
Beyond pathway treatment: calm the Shen, balance hormones, work with depression, addiction and insomnia.
Free chapter · Straight to your inbox
Next Steps
This case applies foundational concepts from our pillar guides. To go deeper:
For the diagnostic foundation: how to diagnose the sick meridian
For the six systems framework: the 6 Systems explained
For point selection technique: how to find the ashi point
For projection and imaging logic: Mirroring and Imaging in the Balance Method
For Local vs Global decisions: Global vs Local Balance
For the neck and shoulder zone in depth: shoulder pain and frozen shoulder
For another Local Balance case on the Small Intestine: our wrist and forearm pain case study
For the complete matrix reference: Balance Method Matrix
To discuss cases with colleagues worldwide: Practitioner Community
New to the terminology? See the Balance Method Glossary for every core term in one place.
