
How to Find the Ashi Point in Balance Method Acupuncture: Palpation, Depth & the Feedback Loop
Let's take a case of scapular pain as an example: You've done everything right.
Sick meridian identified: Small Intestine.
System chosen:
System 4, giving you Liver as the treating meridian (the matrix).
Projection applied: the scapular pain maps onto the tibia through a direct puppet show image.
Now you're looking at a 17-centimeter stretch of Liver channel along the patient's lower leg. You know the zone. But you need one point — the point that makes the treatment work.
You press your thumb firmly into the tissue along the tibia. The patient says nothing at the first spot. Nothing at the second. At the third spot — slightly more proximal — the patient flinches. Not dramatically, but unmistakably. Something is there. You press again, a little deeper. The reaction confirms: this is the ashi point. You needle it, oblique along the bone. You ask the patient to move the affected shoulder. The scapular pain drops from a seven to a two.
That flinch — that moment of reactive sensitivity — is the difference between a treatment that works and one that doesn't. Finding the ashi point is where the Balance Method's logical framework meets the practitioner's hands. And it's a skill that develops with every patient you treat.
This guide builds directly on the six systems and the projection techniques. Together, they complete Dr. Tan's three-step strategy from diagnosis to needle.
What the Ashi Point Is — and What It Isn't
In traditional acupuncture, "ashi" is often translated loosely as "that's the point" — a tender or reactive spot found by palpation. In classical TCM, ashi points are treated as a third category of acupoints alongside named channel points and extra points. Many practitioners equate them with Western trigger points.
In the Balance Method, the ashi point serves a more specific function. It's not a random tender spot and it's not a trigger point in the myofascial sense. It's the precise location on a treating meridian, within a projected zone, that confirms your entire diagnostic and treatment logic is correct.
When you find a clear ashi point in your projected zone, it means:
Your meridian diagnosis (Step 1) is accurate
Your system choice (Step 2) is producing a valid balancing relationship
Your projection (Step 3) has landed you in the right area
The specific tissue under your finger is the target for your needle
When you can't find an ashi point, that's equally valuable information. It may mean one of the earlier steps needs revision — not that the patient is unresponsive.
Ashi in Balance Method vs. Classical TCM
| Aspect | Classical TCM Ashi | Balance Method Ashi |
|---|---|---|
| Location | Anywhere on the body | On the treating meridian, within a projected zone |
| How found | Palpation for tenderness | Palpation for any reactive response (not only pain) |
| Relationship | Confirms local pathology | Confirms entire 3-step treatment logic |
| Needle depth | Standard depth guidelines | Determined by anatomical structure similarity |
How to Palpate for the Ashi Point
Pressure: Firm and Gradual
Palpation for Balance Method ashi points is not gentle touching. You need firm, sustained pressure — applied gradually and progressively. Light surface contact won't reveal what's happening deeper in the tissue. Press with your thumb or fingertip, increasing pressure slowly, and hold at each spot long enough for the patient to register the sensation.
A critical mistake beginners make is moving too quickly from spot to spot. "Don't go too fast , if it's too fast for the patient to feel if there's ashi, and too fast for you to feel it under your finger." Give the patient time to process. Give yourself time to feel what's under your fingertip.
On areas where there's mostly skin and bone — like the sternum or the tibial crest — be precise rather than heavy. Don't press broadly with a flat thumb. Use the tip of your finger, move in very small increments, and shift slightly to the side between presses. On fleshy areas, you can press wider and deeper.
The Memorize-Then-Needle Technique
Here's a practical technique used in clinical practice: when you need to needle multiple ashi points in the same area, palpate the entire zone first and memorize the reactive points before placing any needles. If you palpate one point, needle it, then try to palpate the point right next to it — the patient can't distinguish between the pain from your palpation and the sensation from the needle you just placed. So the sequence is: palpate the full zone, remember two or three ashi locations, then go back and needle them. Move to the next section, palpate again, needle again.
What You're Feeling For
The ashi reaction is not limited to sharp pain. The transcripts from Balance Method training are clear: you tell the patient "you're not looking for something painful — you're looking for something that is sensitive, or for a point that feels more sensitive than the others." Patients respond in different ways:
Patient Response Guide
| Patient Response | What It Means |
|---|---|
| Sharp tenderness — the "ah!" reaction | Classic ashi — strong, clear confirmation |
| Slight sensitivity — noticeable but not painful | Valid ashi — "it doesn't have to be painful" |
| A physical jump or startle response | Reliable indicator — the body reacts before description |
| The spot "feels different" from the surrounding area | Relative sensitivity — the spot stands out |
Some patients are tough — they don't show reactions easily. Others have fear of pain and overreact to every touch. With experience, you learn to distinguish genuine ashi sensitivity from a patient's general pain response. But there is no direct correlation between ashi intensity and treatment outcome: patients with no ashi reaction can still respond very well to treatment, and a dramatic ashi doesn't guarantee a stronger result.
When palpating, put your awareness at the tip of your finger. You're not only listening to the patient's verbal response — you're also feeling what's happening under your fingertip. Note the depth at which the patient reacted, because that's the depth your needle needs to reach. Note the tissue quality. Over time, these two sources of information — the patient's response and your own tactile sense — work together to pinpoint the exact needle location, depth, and angle.
What Your Fingers Learn Over Time
Early in your practice, you rely almost entirely on the patient's verbal feedback. But over months and years of palpation, your fingers develop their own sensitivity. You start noticing changes in tissue quality — a spot that feels slightly tighter, warmer, more resistant, or texturally different from the millimeters around it. Experienced practitioners can often locate the ashi point before the patient reports anything, simply by feeling the tissue response under their fingers.
Eventually, some practitioners report they can even see the ashi point — a visible difference in skin tone or texture at the reactive spot. This is not mystical — it's a perceptual skill that develops through thousands of palpations. The more patients you palpate, the faster and more accurate your fingers become.
When You Don't Look for Ashi
Not every Balance Method treatment requires ashi palpation. When treating internal or systemic conditions — general discomfort, emotional issues, organ-level problems — you may use specific acupuncture points based on their known functions rather than palpating for ashi. In these cases, what matters is that you're at the correct point location and achieve a Qi sensation (deqi) if possible. You don't need to match tissue type or look for tenderness — you need the point's functional properties. Ashi palpation is primarily essential for musculoskeletal and pain-related conditions where anatomical structure similarity and precise location determine the clinical result. The distinction between ashi-driven and point-driven treatments is covered in depth in advanced training programs.
Where to Palpate: The Projection Gives You the Zone
You never palpate blindly along an entire meridian. The projection — whether a Mirror, Image, or Big Image — narrows your search to a specific zone. Within that zone, you palpate along the treating meridian until you find the reactive point.
Working the Zone Systematically
Once your projection gives you a zone — say, the area between Liver 4 and Liver 5 for a scapular pain projection — you work through it methodically. Start at one end of the zone, press firmly, hold, note the response, move a few millimeters, press again. Work your way through the entire projected zone before deciding on your needle location.
Don't stop at the first spot that gives a mild reaction. Palpate the entire zone first. Compare the reactions at different spots. The strongest, most distinct ashi point is your target — and it might not be the first one you find.
When the Zone Is Too Small
Sometimes a projection compresses the problem area into a very small zone — just a few centimeters or even less. In these cases, ashi palpation becomes difficult because there's simply not enough physical space to differentiate between spots. The solution, as covered in the projections guide, is to enlarge the projection. Switch from a Puppet Show Image to a Big Image. Move from a small foot projection to a full leg projection. Give your fingers enough room to work.
Needle Depth: Anatomical Structure Similarity
In the Balance Method, needle depth is not determined by textbook guidelines ("needle 0.5 to 1 cun perpendicular"). It's determined by anatomical structure similarity — the principle that your needle should reach the same type of tissue at the treatment site as the tissue involved in the patient's problem.
Dr. Tan's Mississippi Technique
Dr. Tan taught a specific needle insertion sequence in his seminars that has become a hallmark of Balance Method practice: break the skin quickly (that's the painful moment), then wait. Count "Mississippi 1, Mississippi 2, Mississippi 3" — giving the body time to adjust. Then slowly advance the needle toward the ashi point with the tip aimed precisely at the target tissue.
Why wait? If you penetrate fast and go deep immediately, the tissue doesn't have time to move aside. Vessels and small nerves get hit, causing pain or hematoma. The pause after breaking the skin lets the deeper tissue accommodate the needle. It also gives you time to feel what kind of tissue your needle is entering — and that tactile feedback guides your depth and angle. For visual reference of this technique in action, see our needling demonstration page.
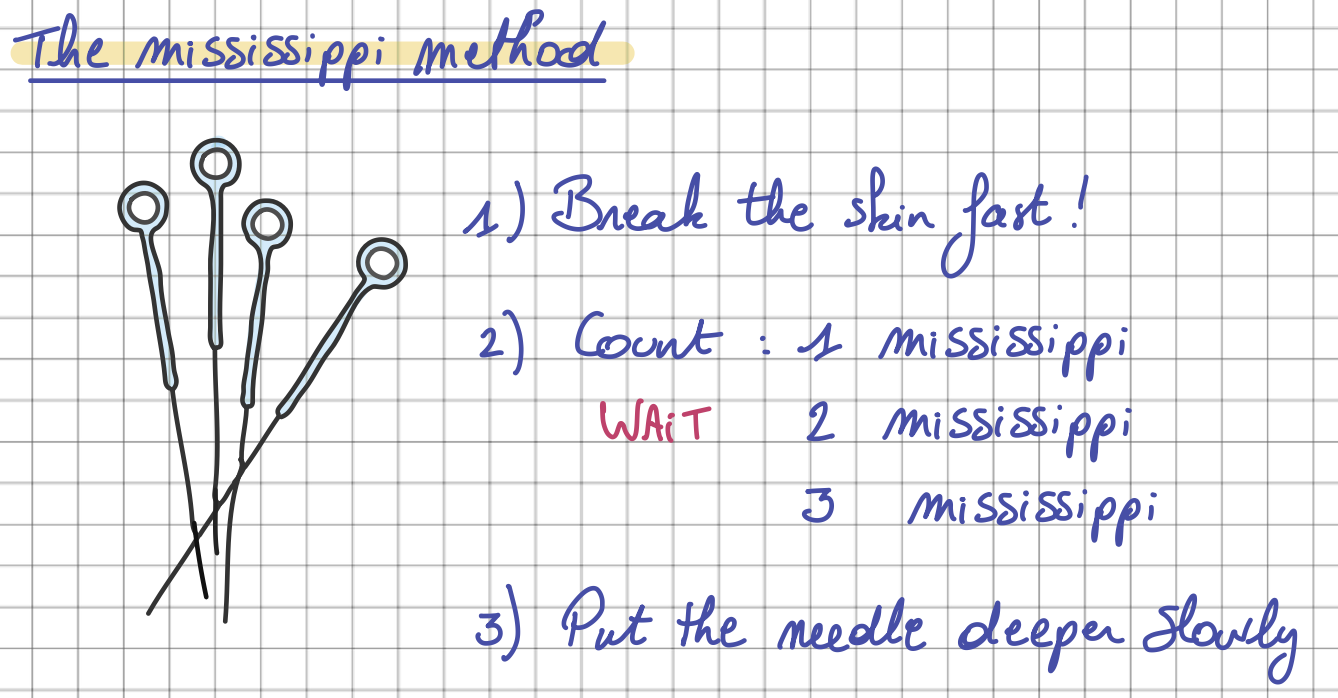
The Mississippi method - Dr. Tan - Balance Method Notebook by Laurence Meyfroodt
Bone for Bone, Tendon for Tendon, Muscle for Muscle
This is one of the most important clinical principles in Balance Method practice:
Needle Depth: Structure Similarity
| Problem Location | Target Tissue | Depth Action |
|---|---|---|
| Bone (scapula, tibia, occiput) | Bone at treatment site | Needle to bone |
| Tendon (Achilles, wrist extensors) | Tendon at treatment site | Catch the tendon — feel resistance |
| Muscle (calf, forearm belly) | Muscle at treatment site | Needle into the muscle body |
| Skin (numbness, itching) | Superficial tissue | Stay shallow — subcutaneous |
This is why system choice (Step 2) matters so much: different systems land you on different treating meridians, and different meridians offer different tissue types at the same projected zone. As described in the systems guide, Dr. Tan chose System 4 for scapular pain (full story is written in the balance method notebook) precisely because the Liver channel at the tibia gives you bone — matching the bony nature of the scapula. Another system would give you flesh or tendon at the same projection zone — valid, but not as structurally matched.
For internal conditions — heart palpitations, lung issues, abdominal problems — you can't always match the exact tissue. You can't needle "lung tissue for lung tissue." In these cases, match the depth as closely as possible. Soft tissue for soft tissue. A joint space (a "hole") for an organ opening like the eye. The principle of anatomical structure similarity adapts to what's clinically possible.
Needling Around Obstacles
Sometimes the ashi point falls directly on a blood vessel. Don't needle straight into it. Instead, enter the skin a few millimeters away from the vessel, then angle your needle obliquely so the tip arrives underneath the vessel at the ashi point. You reach the same target tissue from a different entry angle — avoiding the vessel entirely. This technique works for any obstacle: a scar, a mole, or a spot that's too tender for direct needle entry.
Angle and Coverage
Balance Method needling rarely follows standard perpendicular insertion. The angle of your needle depends on what you need to achieve and what the patient's problem looks like.
The core principle is coverage: if the patient's problem is a point, you needle a point. If the problem is a line (like pain running along a section of the spine), you should cover a line on the treating meridian. If it's an area (like the entire scapula), you cover an area. A perpendicular needle covers a single point — which is insufficient if the patient has a broad area of pain.
For bony areas like the tibia, an oblique angle parallel to the bone lets a single needle cover several centimeters subcutaneously — matching the width of the patient's problem area on the scapula. On a tendon, you align the needle parallel to the tendon fibers so it runs through the structure rather than crossing it. For muscular areas, a deeper perpendicular approach works because the muscle body has depth to absorb the needle.
The key insight: in Balance Method practice, there are no fixed needling protocols for specific points. There's no "LR-4 should be needled at 0.5 cun perpendicular." The anatomy under your needle, the shape of the patient's problem, and the tissue you need to reach all guide your angle and depth. This is why practitioners in this lineage never learn standardized angles per point — every situation demands its own approach. Detailed needling protocols for each meridian and projection type are documented in the Balance Method Notebook.
When There's No Ashi Point
It happens. You've done your projection, you're palpating along the treating meridian, and the patient reports nothing — no tenderness, no sensation, no reaction at all. What now?
Step 1: Check Your Logic
Before assuming the patient is non-reactive, go back through your three steps. Is your meridian diagnosis (Step 1) correct? Could the pain be on an adjacent meridian that you initially ruled out? Is your system choice (Step 2) giving you the strongest balancing option, or did you default to System 1 out of habit? Is your projection (Step 3) accurate — are you in the right zone?
In training, the most common reason for a missing ashi point is a subtle error in one of these earlier steps. The absence of an ashi point is feedback — it's telling you to reconsider.
Step 2: Try a Different System
If your diagnostic logic seems solid, switch systems. Each system gives you a different treating meridian, which means a different tissue environment and a different projected zone. The ashi point may be clear and obvious on the meridian from System 2 even though it was absent on the meridian from System 1. This is exactly why having six systems is so valuable — if one pathway doesn't produce a clear ashi, another one will.
Step 3: Accept and Proceed
Some patients genuinely don't produce strong ashi reactions — especially in chronic, long-standing conditions where the tissue has adapted. In these cases, you follow your projection logic and needle where the anatomy dictates. The treatment can still work. The ashi point is the ideal confirmation, but its absence doesn't automatically invalidate a well-reasoned treatment plan.
The Ashi Point as Feedback Loop
What makes the Balance Method fundamentally different from many acupuncture styles is its built-in feedback at every step. The ashi point is part of a continuous feedback loop:
Before needling: the ashi point confirms your three-step logic is correct. You've found a reactive spot exactly where your system and projection predicted it would be. Confidence is high.
During needling: the tissue response under your needle — resistance, warmth, a sensation of "arrival" — tells you whether your depth and angle are appropriate.
After needling: you immediately retest the patient. Ask them to move, bend, press the painful area. If the pain drops significantly, the entire chain — diagnosis, system, projection, ashi point, depth — was correct. If the result is partial, you have immediate information about what to adjust.
This feedback loop is what makes the Balance Method learnable. You're never guessing. Each treatment gives you data about what worked and what didn't, which sharpens your clinical judgment for the next patient.
Quick Reference Card: Ashi Palpation
The final confirmation of Step 3. All palpation rules and depth decisions included.
Ashi Identification
| Patient Response | Classification |
|---|---|
| Sharp tenderness ("ah!" reaction) | ✓ Classic |
| Slight sensitivity / tenderness | ✓ Valid |
| Physical jump or startle | ✓ Reliable |
| "Feels different" from surrounding area | ✓ Relative |
Needle Depth by Tissue
| Problem Type | Target | Action |
|---|---|---|
| Bone problem | → | Needle to bone |
| Tendon problem | → | Catch the tendon |
| Muscle / Flesh | → | Into the muscle body |
| Superficial / Skin | → | Stay shallow |
No Ashi? Checklist
- Re-check meridian diagnosis (Step 1)
- Try a different system (Step 2)
- Enlarge the projection (Step 3)
- Try the other side
- Accept and proceed with best logic
Complete palpation guides & clinical protocols:
Get the Balance Method NotebookFrequently Asked Questions
Is the ashi point the same as a trigger point?
Not in Balance Method context. A myofascial trigger point is a hyperirritable spot in skeletal muscle associated with a taut band, found by local palpation. A Balance Method ashi point is a reactive spot on a treating meridian — often far from the patient's problem area — found within a projected zone. The clinical logic, location, and purpose are different, even though both involve palpation for reactive spots.
How hard should I press when palpating?
Harder than you think. Firm, sustained pressure — gradually increasing — is essential. Light surface palpation won't reveal deeper tissue responses. The key is to press gradually and hold at each location long enough for the patient's nervous system to register the stimulus. With practice, you'll develop a sense of the right amount of pressure for each tissue type and body area.
Can I needle a standard acupuncture point instead of an ashi point?
You can, and sometimes a named point will coincide with the ashi point. But in Balance Method practice Local Balance, the ashi point takes priority over named points. If your ashi point falls at Liver 4.5 — between Liver 4 and Liver 5 — you needle at 4.5, not at the nearest named point. The projection and the patient's reactive tissue determine the location, not the textbook.
What if the patient says everywhere is tender?
Ask them to compare: where is it most tender? Where does it feel most different? There's almost always a spot that stands out from the rest. If the entire zone is uniformly reactive, consider enlarging the projection to give yourself a wider area with more differentiation. You can also try a different system — a different treating meridian may give you a clearer, more distinct ashi response.
Next Steps
With the ashi point, the three-step framework is complete. You now have the full clinical sequence that Dr. Tan built into the Balance Method: diagnose the sick meridian, choose the balancing meridian through one of six systems, locate your zone through a projection, find the ashi point, match your needle depth to the tissue, and retest immediately.
The next step is the same one Dr. Tan always emphasized: practice. Treat patients. Let the feedback loop sharpen your skills with every treatment. Start simple — one system, one projection, one ashi point — and let the complexity build naturally over time.
For visual reference charts with palpation guides for every meridian and clinical protocols organized by condition, the Balance Method Notebook is designed as your daily clinical companion. For foundational reading in Dr. Tan's own words, explore the books collection. When you're ready for supervised, hands-on practice, training programs are where palpation truly becomes second nature.
Watch ashi palpation and needling techniques in action on our needling demo page. And join our practitioner community to discuss cases, share palpation tips, and learn from 7,000+ practitioners who use the Balance Method daily.