
Dr. Tan's Mirroring & Imaging Explained: How Balance Method Point Selection Works
The patient has chronic low back pain — deep, aching, on the right side of the lower back. You've diagnosed the sick meridian: Urinary Bladder. Your system gives you Lung as the treating meridian. You look at the patient's forearm — the entire Lung channel runs there. But the lower back pain could correspond to any spot along a 25-centimeter stretch of forearm. You could needle anywhere.
You need one point. The right one.
You recall the Puppet Show Image: the shoulder joint corresponds to the coccyx. The elbow is the navel line. The lower back sits just below the navel — so on the forearm, it maps just proximal to the elbow. You palpate along the Lung channel in that zone, pressing firmly. The patient flinches at one specific spot. You needle it. You ask her to stand and bend forward. For the first time in months, she bends without guarding.
That's a projection at work — and it's the skill that turns the six systems from theory into clinical results.
Dr. Tan developed a precise set of projection techniques that map the body onto the limbs. Once you understand how they work, you can translate any pain location into a specific needle placement on the treating meridian — with anatomical logic, not guesswork. This guide covers the essential projections every practitioner needs: the Mirror, the Image, the Big Image, and their reversed variants. It's the natural next step after understanding the Balance Method systems — and the piece that makes them clinically operational.
Step 3:
Where Projections Fit In
If you've read our guide on the six Balance Method systems, you know that every treatment follows three steps.
Step 1: diagnose the sick meridian.
Step 2: choose the balancing meridian using one of the six systems (look up the treating meridian in the matrix.)
Step 3: find the exact needling location on that balancing meridian.
Projections are the primary tool for Step 3. They give you a systematic way to locate where on the treating meridian to place your needle — by mapping the area of the patient's problem onto the treating limb using anatomical landmarks.
One rule is absolute: never skip from Step 1 directly to Step 3. You must go through the system choice (Step 2) first. The projection only works when you already know which meridian you're projecting onto. Without that, you're just needling a location — not balancing a meridian.
There are two fundamental projection types, determined by one simple question: where is the patient's problem?
The Two Projection Types
| Problem Location | Projection Type | What It Does |
|---|---|---|
| On a limb (Hand, Foot, Knee, etc.) | Mirror | Projects one limb onto another limb |
| On the head or trunk (Back, Face, etc.) | Image | Projects head and trunk onto a limb |
The Mirror: Limb Projects onto Limb
The Principle
The Mirror is the most intuitive projection. If the patient's problem is on a limb, you project that limb onto another limb — either arm-to-arm, leg-to-leg, or arm-to-leg (and vice versa). Which limb you project onto depends entirely on the result of your Step 2: the treating meridian determines whether you're working on a hand channel or a foot channel.
The logic is simple: place the two limbs side by side (mentally or physically) and match location for location. Fingers correspond to fingers — or to toes if you're crossing between upper and lower limb. Wrist corresponds to wrist — or to ankle. Elbow to elbow — or to knee. Shoulder to shoulder — or to hip.
Landmarks and Proportion
The landmarks that anchor a Mirror projection are always joints. You don't measure centimeters or draw parallel lines — you match joint to joint, then work by proportion between them.
Mirror Landmarks: Arm ⟷ Leg
| Upper Limb Landmark | Relation | Lower Limb Landmark |
|---|---|---|
| Fingers / Hand | ⟷ | Toes / Foot |
| Wrist joint | ⟷ | Ankle joint |
| Elbow | ⟷ | Knee |
| Shoulder joint | ⟷ | Hip joint |
If the patient's problem falls exactly on a landmark — say, right at the wrist — you go directly to the corresponding landmark on the treating limb: the ankle (if treating a foot meridian) or the opposite wrist (if treating a hand meridian).
If the problem falls between two landmarks — for example, halfway between the wrist and the elbow — you go to the proportional midpoint between the corresponding landmarks on the treating limb. It's always about proportion relative to the joints, never about absolute distances.
Clinical Example
A patient has lateral elbow pain — along the Large Intestine channel. Your Step 2 (using System 1) gives you Stomach as the treating meridian. The problem is on a limb, so you use a Mirror. Elbow corresponds to knee. You go to the Stomach channel at the knee level on the opposite side, palpate for an ashi point, and needle. You retest the elbow immediately.
The Reversed Mirror
Sometimes a direct Mirror lands you in an area that's awkward to needle or difficult to palpate. When that happens, you reverse the projection. In a Reversed Mirror, the distal and proximal ends swap — but the central joint stays fixed.
Reversed Mirror (Arm)
| Direct Mirror | Reversed Variant |
|---|---|
| Fingers / Hand | Top of shoulder |
| Wrist | Shoulder joint |
| Elbow | Elbow (Pivot) |
| Shoulder joint | Wrist |
Reversed Mirror (Leg)
| Direct Mirror | Reversed Variant |
|---|---|
| Toes / Foot | Top of hip |
| Ankle | Hip joint |
| Knee | Knee (Pivot) |
| Hip joint | Ankle |
The critical rule: the elbow and knee never move when reversing. They stay as the fixed central pivot in every reversed mirror. Only the distal and proximal ends swap around them.
When would you reverse? A common scenario: a patient has wrist pain, and your direct mirror points you to the opposite wrist — but the treating meridian runs through a location that's uncomfortable or impractical on the wrist. A reversed mirror shifts the wrist correspondence to the shoulder joint, giving you a completely different (and possibly more accessible) needling zone on the same treating meridian.
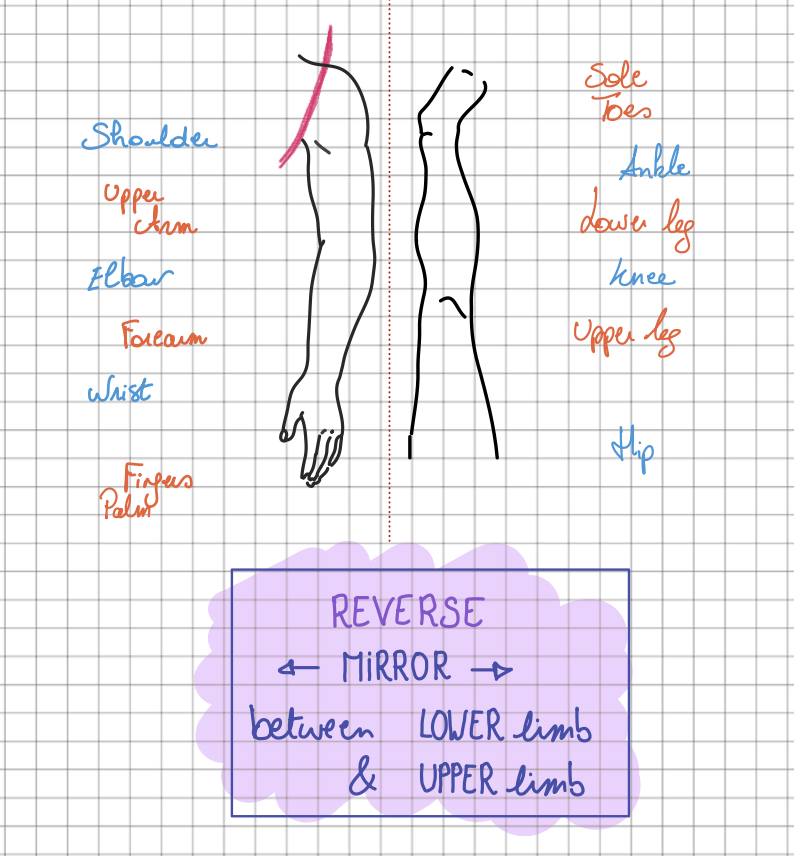
Reverse Mirror from the Balance Method Notebook by Laurence Meyfroodt
The Image: Head and Trunk Project onto a Limb
The Principle
When the patient's problem is on the head or trunk — neck pain, back pain, chest tightness, headache, abdominal discomfort — you can't use a mirror because the problem isn't on a limb. Instead, you use an Image: a projection that maps the entire head and trunk onto a single limb.
Dr. Tan called this the Puppet Show Image — because it turns the arm or leg into a miniature version of the body, like a puppet. The head sits at the distal end (hand or foot), and the trunk unfolds toward the proximal end (shoulder or hip).
Puppet Show Image — Arm
| Body Region | Arm Location |
|---|---|
| Head | Hand (fingers / palm) |
| Neck | Wrist |
| Navel line / L2 | Elbow |
| Coccyx / Pubic area | Shoulder joint |
Puppet Show Image — Leg
| Body Region | Leg Location |
|---|---|
| Head | Foot (toes) |
| Neck | Ankle |
| Navel line / L2 | Knee |
| Coccyx / Pubic area | Hip joint |
The same landmark principle applies: the navel line always corresponds to the central joint (elbow or knee). Everything above the navel maps distally (toward hand/foot), everything below maps proximally (toward shoulder/hip). Between landmarks, you work by proportion.
Clinical Example
A patient has mid-thoracic back pain — roughly between the shoulder blades, along the Urinary Bladder channel. The area is above the navel line, so on the arm it maps between the wrist and elbow. You estimate the proportional location: the mid-thoracic region sits roughly in the middle third of the upper body, so on the forearm it falls in the middle third between wrist and elbow. You palpate along the treating meridian in that zone, find the ashi point, and needle.
The Reversed Puppet Show Image
Just like the Mirror, the Image can be reversed. In a Reversed Puppet Show Image, the head moves from the distal end to the proximal end — but the central joint (elbow or knee) stays as the navel line.
Reversed Puppet Show Image
The central joint (Elbow/Knee) remains the fixed pivot point in all reversals.
Reversed Image — Arm
| Direct Image (Arm) | Relation | Reversed Variant |
|---|---|---|
| Head = Hand (Fingers / Palm) | ⟷ | Head = Top of shoulder |
| Neck = Wrist | ⟷ | Neck = Shoulder joint |
| Upper body = Wrist → Elbow | ⟷ | Upper body = Shoulder → Elbow |
| Navel = Elbow | ⟷ | Navel = Elbow (Fixed) |
| Lower body = Elbow → Shoulder | ⟷ | Lower body = Elbow → Wrist |
| Coccyx = Shoulder joint | ⟷ | Coccyx = Wrist |
Reversed Image — Leg
| Direct Image (Leg) | Relation | Reversed Variant |
|---|---|---|
| Head = Foot (Toes) | ⟷ | Head = Top of hip |
| Neck = Ankle | ⟷ | Neck = Hip joint |
| Upper body = Ankle → Knee | ⟷ | Upper body = Hip → Knee |
| Navel = Knee | ⟷ | Navel = Knee (Fixed) |
| Lower body = Knee → Hip | ⟷ | Lower body = Knee → Ankle |
| Coccyx = Hip joint | ⟷ | Coccyx = Ankle |
Why reverse? A direct image places the head on the hand — which works well for neck and upper back issues. But for low back or sacral pain, the direct image pushes you toward the shoulder, which can be less precise or harder to palpate. Reversing flips the orientation so the lower body maps onto the forearm — a much more accessible area with better ashi point palpation.
The Big Image: Enlarging for Precision
The Problem It Solves
The Puppet Show Image maps the entire head and trunk onto one limb. That's a lot of body compressed into a relatively small area — and sometimes the projected zone is too small to palpate with precision. A cervical headache might project onto just a centimeter of the hand. A specific eye-level pain might land on a tiny spot near the fingertips.
When the projection zone is too compressed to find a clear ashi point, you enlarge the projection. This is the Big Image — specifically the Big Head Image — which takes just the head and projects it onto the entire arm or leg instead of just the hand or foot.
Big Head Image — Arm
In this projection, the hand and fingers are excluded (fold them away mentally). The arm from shoulder to wrist becomes the canvas for the head:
Big Head Image Landmarks
| Head Region | Arm Location | Leg Location |
|---|---|---|
| Top of head (vertex) | Shoulder (proximal end) | Hip (proximal end) |
| Upper head | Between shoulder and elbow | Between hip and knee |
| Eye line | Elbow | Knee |
| Lower face (nose, mouth) | Between elbow and wrist | Between knee and ankle |
| Bottom of chin | Wrist | Ankle |
Like every projection, the Big Image can also be reversed. In a reversed Big Image, the top of the head moves to the wrist/ankle end and the chin moves to the shoulder/hip end — while the eye line stays at the elbow/knee. You reverse when the direct version places your target in an inconvenient location.
Clinical Example
A patient has a specific headache behind one eye — Gallbladder territory. With a regular Puppet Show Image, the head projects onto just the hand or foot. That's a tiny area with limited palpation options. Switching to a Big Image, the eye line maps to the elbow (on the arm) or knee (on the leg). Now you have a clear landmark, a larger palpation zone, and much better access to find a reactive ashi point on the treating meridian at elbow or knee level.
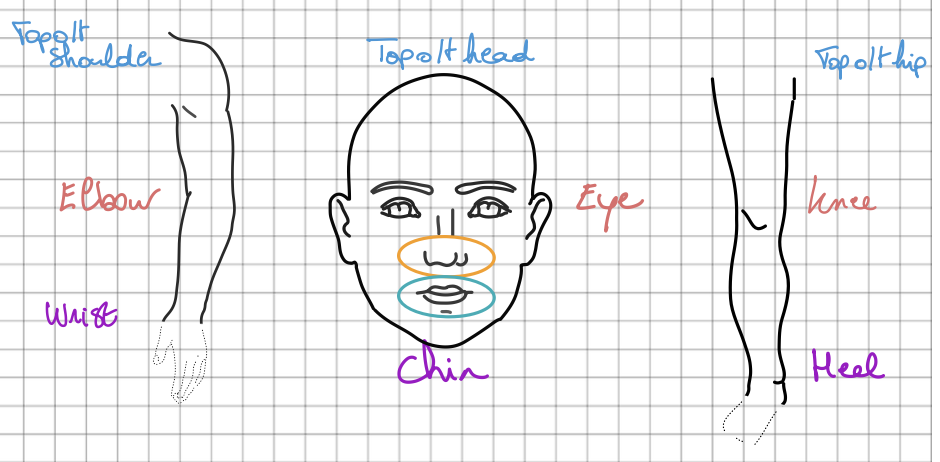
Big Head Image from the Balance Method Notebook by Laurence Meyfroodt
Precision versus Sensitivity
One of the most practical concepts in Balance Method projection work is the relationship between projection size and clinical effect. Larger projections give you more precision — more physical space to palpate, easier to locate the exact ashi point. Smaller projections give you more sensitivity — because the entire body is compressed into a tiny area, each point carries a more concentrated effect.
Think of it as a spectrum:
Precision vs Sensitivity Spectrum
| Projection Size | Precision | Sensitivity |
|---|---|---|
| Large (Big Image) | High — easy to find ashi | Lower |
| Medium (Puppet Show) | Good | Good |
| Small (Hand/Foot) | Lower | Higher |
| Very Small (Metacarpal) | Minimal | Very high |
Clinically, you can use this spectrum strategically. Consider a patient with chest tightness in the cardiac area. A Puppet Show Image on the arm gives you a large zone — the whole forearm between wrist and elbow — where you can palpate thoroughly and find a precise ashi point. But if you also needle a point on the metacarpal (a tiny, compressed projection of the same area), that single point carries highly concentrated sensitivity. The combination of a precise large-projection point plus a sensitive small-projection point is what makes complex Balance Method treatments so effective — and it's a technique explored in depth in advanced training programs.
Beyond the Basics: Advanced Projections
The Mirror, Image (Puppet Show), and Big Image — each in direct and reversed form — are the six essential projections that cover the vast majority of clinical situations. But there are additional projection techniques for specific scenarios that practitioners encounter in advanced work:
Scalp Projection — maps the whole body (Du Mai, Ren Mai, legs and feet) onto the scalp. Useful for conditions where you want to add a cranial needling component, or when a limb problem needs an approach. The hairline serves as a key landmark.
Sternum Projection — maps the body (Du Mai) onto the sternum bone. A specialized technique for specific clinical situations involving the front of the head.
Tibia-Metacarpal Mirror — projects a larger leg segment (tibia or femur) onto the much smaller metacarpal bone. This creates a very compressed but highly sensitive mirror projection — the same principle as the precision-sensitivity spectrum, applied between limb segments of different sizes.
And many more projections exist.
These advanced projections follow the same underlying logic: landmarks, proportion, and ashi confirmation. They're taught in advanced workshops and documented in the Balance Method Notebook with visual reference charts. Mentioning them here so you know they exist — but the six essential projections are what you need to master first.
How to Choose the Right Projection
With multiple projection types available, choosing the right one follows a clear decision path. Here are the principles that guide every projection choice:
1. Limb or Head/Trunk?
This is always your first question. If the problem is on a limb, use a Mirror. If it's on the head or trunk, use an Image. There's no ambiguity here — the location of the problem determines the projection type.
2. Is the Needling Area Convenient?
If the direct projection lands you in an area that's hard to access, too sensitive, or impractical to needle — reverse it. Every Mirror and every Image has a reversed variant. The central joint (elbow/knee) stays fixed; only the distal and proximal ends swap.
3. Can You Find an Ashi Point?
If the projection zone is too small to palpate effectively, enlarge the projection. Move from a Puppet Show Image to a Big Image. Move from a foot projection to a full leg projection. Give yourself enough physical space to find a clear, reactive ashi point.
4. Match the Tissue
This principle carries over from system selection: the anatomical structure at your needling location should match the patient's problem. This is known as anatomical structural similarity, or 'ASS' as Dr. Tan used to call it. Bone for bone. Tendon for tendon. Muscle for muscle. If the patient's back pain is deep in the musculature, choose a projection and needle depth that lets you reach muscle tissue. If it's a bony problem, find a projection where you can needle to bone.
5. Keep It Simple
Especially when starting out: one system, one projection, one clear result. Prove to yourself and the patient that it works before adding complexity. The six essential projections (direct and reversed: Mirror, Image, and Big Image) handle the vast majority of clinical situations. Master those first.
Quick Reference Card: Projections
The ultimate clinical guide for Step 3. All landmarks and reversal rules included.
1. Mirror Landmarks (Arm ⟷ Leg)
| Fingers / Hand | ⟷ | Toes / Foot |
| Wrist joint | ⟷ | Ankle joint |
| Elbow | ⟷ | Knee |
| Shoulder joint | ⟷ | Hip joint |
2. Puppet Show Image — Arm
| Head | ⟷ | Hand (Fingers / Palm) |
| Neck | ⟷ | Wrist |
| Upper Body (Neck to Navel) | ⟷ | Forearm (Wrist to Elbow) |
| Navel line / Lumbar 2 | ⟷ | Elbow |
| Lower Body (Below Navel) | ⟷ | Upper Arm (Elbow to Shoulder) |
| Coccyx / Pubic Area | ⟷ | Shoulder joint |
3. Puppet Show Image — Leg
| Head | ⟷ | Foot (Toes) |
| Neck | ⟷ | Ankle |
| Upper Body (Neck to Navel) | ⟷ | Lower Leg (Ankle to Knee) |
| Navel line / Lumbar 2 | ⟷ | Knee |
| Lower Body (Below Navel) | ⟷ | Thigh (Knee to Hip) |
| Coccyx / Pubic Area | ⟷ | Hip joint |
4. Head Big Image Landmarks
| Head Region | Arm Landmark | Leg Landmark |
|---|---|---|
| Top of head (Vertex) | Shoulder | Hip |
| Upper head | Shoulder → Elbow | Hip → Knee |
| Eye line | Elbow | Knee |
| Lower face (Nose / Mouth) | Elbow → Wrist | Knee → Ankle |
| Bottom of chin | Wrist | Ankle |
The Reversal Rule
Any projection can be reversed. The elbow and knee NEVER change position — they always correspond to the Navel line (Puppet Show) or Eye line (Big Image). Only the distal and proximal ends swap places around this midpoint.
Need visual charts for every variant?
Get the Balance Method NotebookFinding the Exact Point: Ashi Palpation
Every projection gives you a zone — but within that zone, the exact needle location is determined by palpation. You're searching for the ashi point: the specific spot on the treating meridian that shows a clear reaction when pressed. Without a confirmed ashi point, even a perfect projection is incomplete.
Ashi palpation is a skill that deserves its own in-depth treatment — including technique, common mistakes, what to do when there's no reaction, and how ashi sensitivity develops over time. We cover all of this in our dedicated guide: How to Find the Ashi Point in Balance Method Acupuncture (coming soon).
Frequently Asked Questions
What is the difference between a Mirror and an Image in Balance Method?
A Mirror projects one limb onto another limb — used when the patient's problem is on an arm or leg. An Image projects the head and trunk onto a limb — used when the problem is on the neck, back, chest, abdomen, or head. The location of the problem determines which type you use. There is no overlap: limb problems always use a Mirror, head/trunk problems always use an Image.
What is the Puppet Show Image?
The Puppet Show Image is Dr. Tan's name for the standard Image projection. It maps the entire body onto a single limb like a puppet: the head sits at the distal end (hand or foot), the navel line corresponds to the central joint (elbow or knee), and the lower body extends toward the proximal end (shoulder or hip). It can be applied to both the arm and the leg, and can be reversed when the direct version is inconvenient to needle.
When should I reverse a projection?
Reverse when the direct projection lands you in an area that is awkward, impractical, or too sensitive to needle or palpate. Reversing swaps the distal and proximal ends of the projection while keeping the central joint (elbow/knee) fixed. The clinical indication for reversing is always practical convenience — not a different clinical effect.
What is the Big Image used for?
The Big Image enlarges the projection of the head onto the entire arm or leg — instead of just the hand or foot. This gives you a much larger palpation zone, making it easier to find a precise ashi point for headaches, facial pain, eye-level problems, and other head-specific conditions. The eye line always maps to the elbow (arm) or knee (leg).
Do I need to use a specific projection for each system?
No. The six systems (Step 2) and the projections (Step 3) are independent decisions. Any system can be combined with any projection type. The system determines which meridian you treat. The projection determines where on that meridian you needle. You choose the projection based on the location of the problem and practical convenience — not based on the system number.
Next Steps
Projections are the final piece that makes the Balance Method clinically operational. Combined with the six systems, you now have the complete framework: diagnose the sick meridian, choose the balancing meridian through a system, then locate your needling point using a projection.
The next step is practice. Start with the simplest combination — System 1 and a direct Mirror for a limb problem. Get your first instant result. Then gradually add Image projections for trunk and head problems. Build confidence one patient at a time.
For visual reference charts showing every projection variant with anatomical landmarks, the Balance Method Notebook is designed as your clinical desk companion. For the foundational texts, explore Dr. Tan's books. And when you're ready for supervised practice with real-time feedback, training programs are where these projections truly come alive.
Watch step-by-step demonstrations of projections in clinical use on our needling demo page. And if you have questions, our practitioner community of 7,000+ members discusses projection techniques and case studies daily.
New to the terminology? See the Balance Method Glossary for every core term in one place.